

Ultimate Windows Context Menu Customizer is a freeware from door2windows that allows you to **customize the context menu of many locations with ease in Windows.
Download Ultimate Windows Context Menu Customizer
Apps from door2windows are truly free and DON'T include any offers to install 3rd-party apps/adware/toolbars/unwanted software and never will. The apps are portable and don't require installation.
Download door2windows App Bundle
door2windows App Bundle gives you access to all the latest apps released by door2windows in one download (along with future updates).Adding An Item
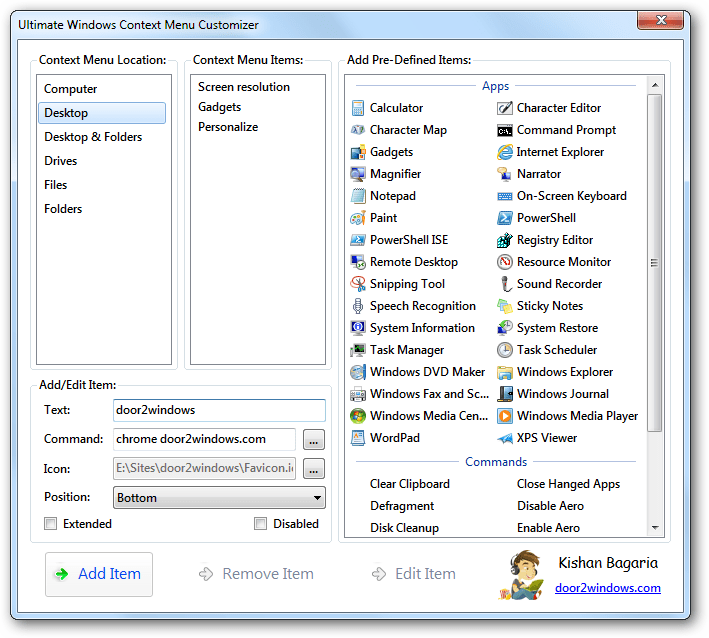
If you want to add a custom item, follow these steps:
-
Run the tool as administrator.
-
Select the location of the context menu from the Context Menu Location list.

-
Enter the text that will appear in the context menu in the Text text box.
-
Enter the command that will be executed when you click the option in the Command text box. If you want the option to open a file, enter the path of the file. You can click on the … button to browse the file. If you want the option to open a folder, enter explorer followed by a space and the path of the folder. If you want the option to open a webpage, enter the name of a browser (chrome for Google Chrome, firefox for Mozilla Firefox, iexplore for Internet Explorer) followed by a space and the URL of the web page.
-
Enter the path of the option's icon in the Icon text box if you want. You can also click on the … button to browse the icon.
-
Select the position of the option.
-
Check Extended if you want the option to only appear when you press SHIFT and right-click.
-
Check Disabled if you want to disable the option temporarily.

-
Click Add Item.
-
The option will be added in the context menu.


If you want to add a pre-defined item, follow these steps:
-
Run the tool as administrator.
-
Select the location of the context menu from the Context Menu Location list.
-
Select the item/items that want to add from the Add Pre-Defined Items list.

-
Click Add Item.
-
The item/items will be added in the context menu.


Editing An Item
-
Run the tool as administrator.
-
Select the location of the context menu from the Context Menu Location list.
-
Select the item that you want to edit from the Context Menu Items list. The Add/Edit Item area will be filled.

-
Edit the fields in the Add/Edit Item area as you like and click Edit Item.


Removing An Item
-
Run the tool as administrator.
-
Select the location of the context menu from the Context Menu Location list.
-
Select the item/items that you want to delete from the Context Menu Items list.
-
Click Remove Item.

